
Safety Instructions for installing FLO G5 charging station
When using electrical appliances, basic precautions should always be followed.
This manual contains important instructions that must be followed when installing, operating and maintaining the Flo charging station. Please read this guide carefully before attempting to install the charging station.
- CAUTION
To reduce the risk of fire, connect only to a branch circuit provided with a maximum surge protection of 40A in accordance with the Canadian Electrical Code (CSA C22.1-12) and the National Electrical Code (ANSI / NFPA 70).
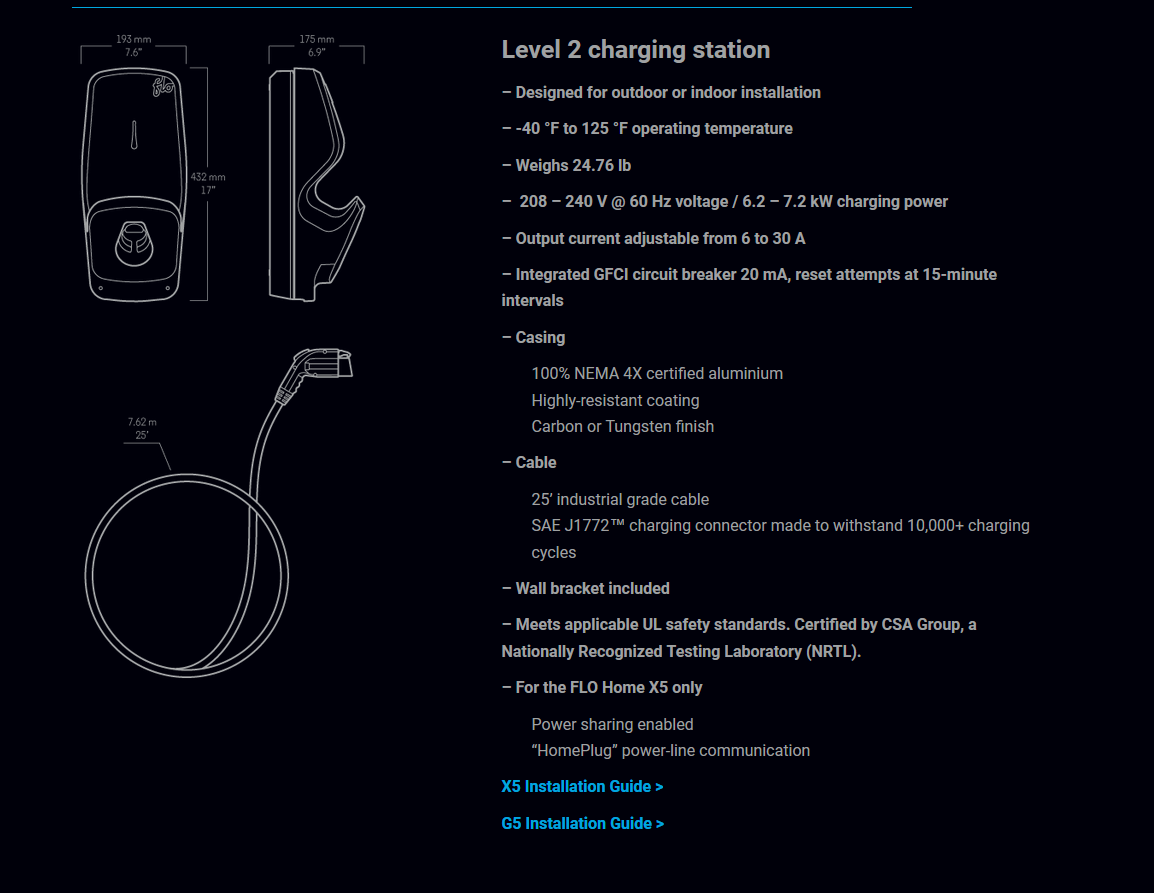
- This charging station has been designed for wall or post mounting.
- Ensure that the mounting surface for the wall or pole is strong enough to support the
weight of the charging station and that the anchors used are compatible with the surface.
- Verify that there is no piping, electrical installation or underground electrical installation
in the area where you will install the station, to avoid serious injuries.
- Connect the power supply of the charging station with caliber 6 AWG to 8 AWG copper conductors rated for usage at a temperature of at least 75°C.
- This product must be connected to a grounded, metal, permanent wiring system, or an equipment-grounding conductor must be run with the circuit conductors and
connected to the equipment grounding terminal and installed by a certified electrician.
- Communicate with a certified contractor, certified electrician or trained installer to ensure compliance with local building code, regulation, security standards and weather conditions.
- Any modification to any part of the charging station will void the warranty.
- Handle parts with care, since they can be sharp-edged. Always use safety glasses and gloves when unpacking and installing.
- Do not install on or over a combustible surface.
- The power supply cables of the charging station must be rated FT2 minimum.
- The input cable strain relief, conduits or armed-cable bushings and adapter:
- A) have to be certified for both Canada and USA;
- B) have to be waterproof (NEMA 4X);
- C) have to be suitable for the outside diameter of the chosen cable and suitable for mounting into a 28.17 mm (1,109 in) diameter opening (for connection through the bottom or back cable opening).
GENERAL SAFETY INSTRUCTIONS
This device should be supervised when used around children. Never insert your finger into the electric vehicle connection. Never use the charging station if the flexible power cord or EV cable is frayed, has broken insulation, or any other signs of damage. Never use the charging station if the enclosure or the EV connector is broken, cracked, open, or shows any other signs of damage. This charging station was designed to be used with electric vehicles equipped with a
SAE-J1772 connector.
This charging station is to be used to charge vehicles that do not require a ventilated environment during charging. Always disconnect the power supply of the charging station before servicing.
Before You Install
The station must be installed by a certified electrician. The station has built-in protection against overvoltage conditions and leakage current to ground.
Installing the Station
The power supply cable can be inserted from the rear (a)
or from under (b) the station:
– 3/4’’ knockout (a) and (b)
– Remove a single cap
– Strain relief not included
1 Disassemble the front casing by removing the 2 front screws and then separate the mounting plate by unscrewing the lower screw. Your charging station must be installed by a licensed electrician.
2 Use the mounting plate as a drilling template after determining the input to be used, either at the rear or under the station
3 Hang the mounting plate securely to a stable surface using a minimum of 3 anchor screws.
4 Insert the conductors and secure the strain relief to the rear housing so that the conductors are long enough to reach the terminals.
5 Secure the rear housing of the station to the mount
6 Screw the lower screw to secure the mounting.
7 Connect the two power wires (L1 and L2) and the ground wire (GND).
8 Install the front housing of the charging station:
A) Hang the top by presenting the front housing at an angle of about 30 degrees, then pivot vertically without forcing.
B) Tighten the 2 front screws with a nominal torque of 55 lbs-in.
9 Switch on the electrical circuit breaker.
Your new station can now charge your vehicle!
Setting the Current Limit
By default, the FLO Home G5 is set to maximum power (factory). If your home’s electrical infrastructure does not allow the charging station at maximum power (or pre-venting any potential current overload), it can be reduced using the Current Limiter Switch.
- Switch “OFF“ the charging station: A In the Breaker Panel set the circuit breaker switching the charging station to “OFF”.B Confirm the charging station’s Light Indicator is “OFF”.
- Before handling the charging station, use a multimeter to determine if an electrical cable is hot. Keep in mind; it is possible for more than one wire to be live.
- Locate Current Limiters switch.
- Using a flat-bladed screwdriver, gently rotate the Switch to the desired position. (See table below).
- Put back the front housing.
- Switch “ON“ the charging station.